
개발새발 블로그
리액트 기초 - 자바스크립트 기본 본문
1. 연산자
let compareA = 1 == '1';
console.log(compareA);
== 는 형타입 상관없이 값만 비교하는 것이기 때문에
true 인 것이고,
let compareA = 1 === '1';
console.log(compareA);
이렇게 ===을 써주면 이때 타입까지 고려해서 참거짓을 판단한다.
false 결과가 나온다.
자바스크립트는 타입에 자유롭기 때문에, 에러가 발생할 확률도 있다.
compareA = "1";
console.log(typeof compareA);
이렇게 typeof 로 형을 물어보면 string 결과를 내준다.
<null 변환 연산자>
let a;
a = a ?? 10;
console.log(a);
a가 undefined 라면 10을 대입하여준다 라는 뜻으로
?? 를 사용한다.
2. 함수
함수 선언식과 함수 표현식의 차이?
// 함수 표현식
let helloA = function(){
	return "안녕하세요";
};

//함수 선언식
function helloB() {
	return "안녕하세요";
}
함수 표현식은 변수에 함수를 담는 것이기 때문에 함수명을 지정해줄 필요가 없다.
그렇다면 함수표현식은 언제 사용할까?
함수 선언식은 가장 밑바닥에 있어도 우선순위로 읽힌다.
하지만 함수 표현식은 그렇지 않다.
console.log(helloA);
console.log(helloB);

// 함수 표현식
let helloA = function(){
	return "안녕하세요";
};

//함수 선언식
function helloB() {
	return "안녕하세요";
}
console.log(helloA); 는 정의되지 않는다. 즉 직접적으로 선언이 된 후에야 console로 찍어볼 수 있고,
console.log(helloB); 는 "안녕하세요" 가 찍히게 된다.
이 함수표현식을 빠르게 사용하기 위해 화살표 함수를 사용한다.
<화살표 함수>
let helloA = () => {
	return "안녕하세요";
}

console.log(helloA);
혹은 더 간추려서 값만 내보내면 된다면
let helloA = () => "안녕하세요";

console.log(helloA);
이렇게도 가능하다.
<콜백 함수>
function checkMood(mood, goodCallback, badCallback) {
    if(mood === "good"){
    	goodCallback();
    } else {
    	backCallback();
    }
}

function cry() {
    console.log("ACTION :: CRY");
}

function sing() {
    console.log("ACTION :: SING");
}

function dance() {
    console.log("ACTION :: DANCE");
}

checkMood("sad", sing, cry);
이렇게 함수를 매개변수로 받는걸 "콜백함수" 라고 한다.
여기선 sing, cry 함수를 매개변수로 checkMood 함수에 넣어주었다.
3. 객체
let person = new Object();	 //객체 생성자
let person = {};	// 객체 리터럴 방식
이렇게 중괄호를 써서 객체를 생성하는 것을 '객체 리터럴 방식'이라고 한다.
보통 객체 리터럴 방식으로 객체를 다룬다!
let person = {
    key: "value",	//property 객체 프로퍼티 라고 부름.
    key1: 123,
    key2: true,
    key3: undefined,
    key4: [1,2],
    key5: function() {}
};

console.log(person);
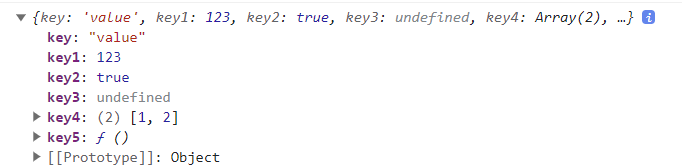
이렇게 콘솔에 출력된다.
여기서 key1 값만 꺼내고 싶으면
console.log(person.key1);또는
console.log(person["key1"]);괄호 표기법을 사용하는 방법도 있다.
대괄호 안에 문자열 형태로 넣어야한다!!
괄호 표기법은 주로 변수를 사용해서 부르고 싶을 때 사용된다.
let person = {
    name: "제티",
    age: 21
};

console.log(getPropertyValue("name"));

function getPropertyValue(key) {
    return person[key];
}
동적인 파라미터를 전달받는 상황, 즉 키가 고정적이지 않은 상황에서 유리하다.
<프로퍼티 추가/변경>
let person = {
    name: "제티",
    age: 21
};

person.location = "한국";	//location에 한국 추가
console.log(person.location);

person["gender"] = "남성";
console.log(person["gender"]);	//gender에 남성 추가
이렇게 객체 생성 후 뒤늦게 프로퍼티 추가도 가능하다.
같은 방법으로 하면 프로퍼티 변경도 가능하다.
<프로퍼티 삭제>
앞에 delete를 써주면 된다.
let person = {
    name: "제티",
    age: 21
};

delete person.age;
//혹은
delete person["age"];
하지만 이렇게 하면 연결만 끊을 뿐 메모리에는 그대로 남아있기 때문에,
let person = {
    name: "제티",
    age: 21
};

person.name = null;
이렇게 작성하면 삭제와 같은 효과를 줌과 동시에,
메모리값도 지울 수 있다.
<this 사용>
let person = {
    name: "제티",
    age: 21,
    say: function () {
        console.log(`안녕 나는 ${this.name}이야.`);
    }
};

console.log(person.say());
따옴표 바뀌는것 주의!!!!!
만약 `가 아니라 " 를 쓴다면 콘솔창에

이런 결과로 나온다.
<객체 존재 확인 방법>
in 연산자를 사용한다.
let person = {
    name: "제티",
    age: 21,
    say: function () {
        console.log(`안녕 나는 ${this.name}이야.`);
    }
};

console.log(`name : ${"name" in person}`);
console.log(`${"age" in person}`);
console.log(`${"gender" in person}`);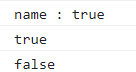
결과값이다.
변수를 사용해서 변동적인 값을 얻어내고 싶다면 `` 를 사용해야한다.
4. 배열 - 배열 내장 함수
<배열 추가 방법>
let arr = [1,2,3,4,5];

arr.push(6);
console.log(arr);
배열 안에 배열, 객체, 함수 등등 뭐든 들어가도 상관없다.
<반복문 사용 객체순환 방법>
let person = {
    name: "제티",
    age: 21,
    tall: 168
};

const personKeys = Object.keys(person);	//객체의 key값을 배열로 저장!!!

for(let i=0; i<personKeys.length; i++){
    const curKey = personKeys[i];
    const curValue = person[curKey];

    console.log(`${curKey} : ${curValue}`);
}
Object.keys 를 사용하면 객체의 키값을 배열로 반환해서 돌려준다!
동일하게 Object.values 를 사용하면 객체의 value 값을 배열로 반환받을 수 있다.
<forEach>
배열과 반복문을 같이 쓰던걸 forEach를 사용하면 한줄만에 작성이 가능하다.
콜백함수를 사용한다.
const arr = [1,2,3,4];

arr.forEach((elm) => console.log(elm));

//콜백함수. 같은뜻으로 풀어쓰면

arr.forEach(function(elm){
    console.log(elm);
});
arr 배열을 한번씩 돌아가며 모두 찍어주는 메소드다.
arr의 값을 2배로 해서 새로운 함수에 저장하기.
const arr = [1,2,3,4];
const newArr = [];

arr.forEach((elm) => newArr.push(elm * 2));

//콜백함수. 같은뜻으로 풀어쓰면

arr.forEach(function(elm){
    newArr.push(elm * 2);
});
좀 더 쉬운 방법으로 map 함수가 있다.
<map>
const arr = [1,2,3,4];
const newArr = arr.map((elm) => {
    return elm * 2;
});
리턴값으로 2배가 적용된 배열을 돌려보낸다.
<includes>
const Arr = [1,2,3,4];

let number = 3;

arr.forEach((elm) => {
    if(elm === number){
        console.log(true);
    }
});
이렇게 배열안에 number와 동일한 값이 있는지 확인하기 위한 방법으로 forEach 를 사용하는 방법도 있지만,
const Arr = [1,2,3,4];

let number = 3;

console.log(arr.includes(number));
includes 함수를 사용하면 값이 존재하는지를 불린형식으로 리턴해준다.
<indexOf>
const Arr = [1,2,3,4];

let number = 3;

console.log(arr.indexOf(number));
만약 number와 일치하는 값이 없다면 -1을 반환한다.
현재 코드에서는 2를 반환한다.
<filter>
const arr = [
    { num: 1, color: "red"},
    { num: 2, color: "black"},
    { num: 3, color: "blue"},
    { num: 4, color: "green"},
    { num: 5, color: "blue"}
];

console.log(arr.filter((elm) => elm.color === "blue"));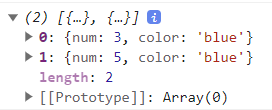
<sort>
let letters = ["나", "가", "다"];

letters.sort();
console.log(letters);
이렇게 사전순으로 정렬이 된다.
근데 이걸 문자열이 아닌 숫자형으로 sort를 사용하게 되면
let numbers = [0,1,3,2,10,30,20];

numbers.sort();
console.log(numbers);
이렇게 숫자 또한 문자열처럼 생각해서 사전순으로 재배열해준다.
이걸 방지해주기 위해
let numbers = [0,1,3,2,10,30,20];

const compare = (a,b) => {
    if(a>b) return 1;
    if(a<b) return -1;
    return 0;
}

numbers.sort(compare);
console.log(numbers);
compare 함수를 사용한다.
return 1 을 반환한다는 것은 숫자를 바꾼다는 뜻이고, -1을 반환하면 냅둔다는 뜻이다.
지금은 오름차순 방법이고,
내림차순은 반대로 써주면 된다.
let numbers = [0,1,3,2,10,30,20];

const compare = (a,b) => {
    if(a<b) return 1;
    if(a>b) return -1;
    return 0;
}

numbers.sort(compare);
console.log(numbers);